The Exposure Value

Blog, Pocket Full Of Fatcaps

Sometimes it’s difficult to know the values for a correct exposure. For example if we want to photograph the lights of the city at night the reading will be inaccurate because those distant sources of light are not intense enough to affect the exposimeter; Or maybe when we want to figure out if the 400 ISO film we have at home will allow us to take perfect photos with our Kodak Brownie during a sunny morning with the fixed settings of this camera (f/16 and 1/30).

There is a solution, but is a bit complicated!

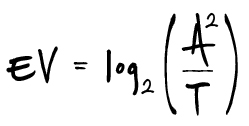
What we’re going to know and use is the “Exposure Value” (EV) which is a unique number that indicates the brightness of a scene.

It is obtained by using a mathematical calculation referred to a sensitivity of 100 ISO:

EV_Formula

Obviously the same exposure value can be obtained with different combinations of the three parameters (ISO/A/T) which is also the concept at the foundation of exposure and photography.

Leaving aside all the mathematical part, we can simply use one of the many charts that we can find on the net, or the one that I propose below (referred to 100 ISO):

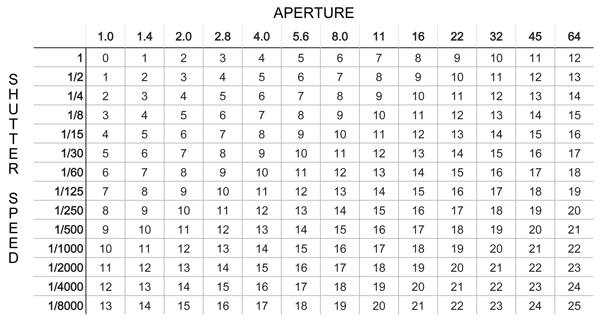
Now to take advantage of the EV you have to connect it to the Sunny 16 rule (on a sunny day, with sharp shadows, to get a correct exposure you have to use f/16 and a shutter speed as closest as possible to the ISO of the film you are using). The EV is a calculation based on 100 ISO then, comparing the values of the Sunny 16 for the same value (f16 and 1/125) with those on the EV chart above, we derive that 15 EV is the amount of light that is present on a sunny day with sharp shadows!

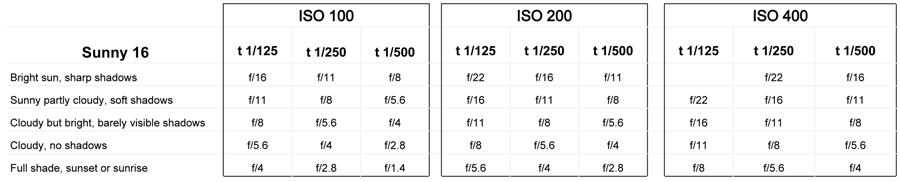
Below I suggest an exemplary data table of how to exploit the EV value in combination with the Sunny 16 rule based on different iso settings but keeping 1/125 as shutter speed:

So I took the EV, I’ve mixed it with the Sunny 16 and I’ve got a handy data table to “guess” the perfect parameters for a good exposition: now you have to simply rearrange the table with your favourite shutter speeds, ISOs and apertures. I know that is a difficult mathematical exercise so I’ve done it for you 😉

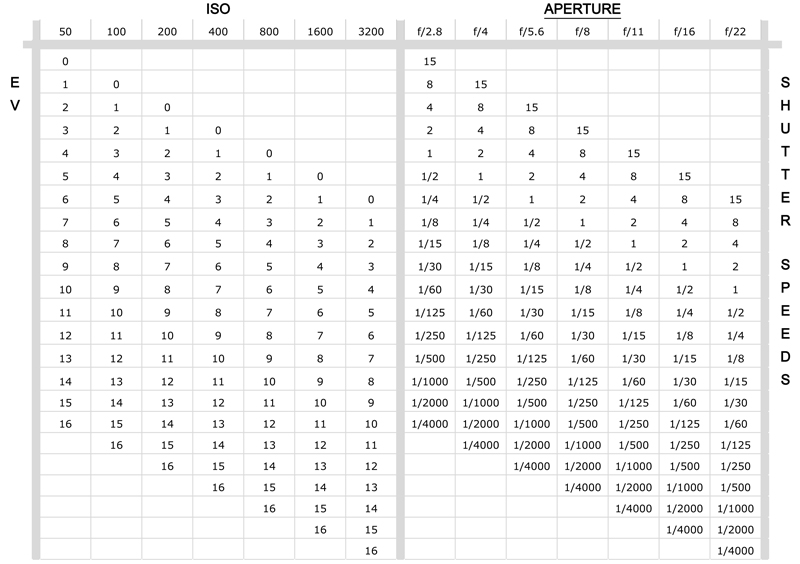
A practical use of this value, as I mentioned, is to help us decide which film we can use referring to the  amount of available light there will be in the scene that we are going to shoot. Or maybe it will help to understand the shutter speeds and apertures needed in conditions where the meter will not function correctly.

Transforming this knowledge into a practical example we can say that if we have to shoot at an indoor sport event, which we know have an EV of 7, we cannot take with us a 400 ISO film, because the camera settings will be f/2.8 1/60: too slow for almost every action.
At least with 800 ISO we can have a shutter speed of 1/125, but may be f/2.8 may result in a too narrow depth of field.
The best decision will be to use a roll of film that tolerate being pushed to 3200 ISO without losing too much quality so we can select an array of settings between f/2.8 + 1/500 or f/4 + 1/250 or even f/5.6 + 1/125. That will be enough to let us choose between a faster shutter speed or a deeper DoF.

Metering without a light meter

Blog, Pocket Full Of Fatcaps

In old film cameras sometimes happens that the exposure meter batteries runs out, or that the selenium cells pass to a better life just at the wrong time or simply that the camera does not have a light meter!

How to solve this problem? With an old “rule” that our grandparents had discovered to “guess” the exposure. In reality behind it there are calculations, experiments and a fine knowledge of the medium 😉

The so-called Sunny 16 rule says that on a sunny cloudless day to achieve the perfect exposure you need to set the aperture to f/16 and the shutter as close as possible to the ISO of the film you are using.

So if I am using a 400 ISO film I have to set the aperture to f/16 with a speed of 1/500, for 100 ISO I will use 1/125 and so on.
After having applied this rule we can change aperture and shutter speed depending on our needs! For example if I’m using a 200 ISO film I should use f/16 and 1/250, but if my need is to photograph a fast moving cyclist, I can push the shutter speed to 1/1000 (2 stops) and compensate increasing the aperture of 2 stops up to f/8.

This is fine for optimal lighting conditions, with a strong sun that casts sharp shadows, but the same rule can also be applied to other lighting circumstances and the only change will be in the aperture settings. Thus, in a not so sunny day, in which the sun creates soft shadows, we will use f/11 instead of f/16, while for a cloudy day with barely visible shadows we will use f / 8 and, for a cloudy weather without visible shadows (or for shooting in full shade), we will set the aperture to f/5.6.

Sunny 16 rule computed for the most common times and ISO settings – Click to enlarge

In “special” conditions, for example shooting in highly reflective environments (snow or white sand), you can use f/22 while for a sunrise or sunset the aperture can be set to f/4 reaching up to f/2.8 for the minutes before of the sunrise.

In case of backlight as a general rule, whatever may be the “power” of the light source, to have the subject properly exposed is necessary to apply the rule and then increase the aperture by two stops.

The Sunny 16 does not stop there, but also helps us in more specific and extreme conditions: for example we go down to f/2 if we want to photograph neon signs or earliest sunrise and sunset glow, f1.4 to expose the fire, shop windows after sunset or night outdoor events and f/1 to shoot indoors (with bright light) or indoor events.

It should be remembered that then in the darkroom, when you go to print the image, or when we scan the negative, we have a margin of at least one recovery stop, so it’s pretty hard to fail completely the exposure

Ferrania Eura: the two apertures available / I due diaframmi disponibili

I would like to add that this rule is the basis of the construction and utilization of some old cameras, back in fashion a few years ago with the Lomographic wave, such as the Kodak Brownie.
The Brownie has no controls: fixed focus to infinity, fixed aperture (f/15) and fixed shutter speed (approx 1/30) that allow it, with a roll of 100 ISO film, to make well exposed photos.
Or the Ferrania Eura wich has a fixed shutter speed of about 1/50 and the possibility to choose only two aperture: f/12 for sunny days and f/8 for the cloudy ones!

These cameras should only be used under certain conditions, but mastering the Sunny 16 rule, we can calculate the correct film speed to take advantage of the native settings for our needs: for example, mounting a 400 ISO film on a Ferrania Eura, make it possible to use it in conditions of full shade so with 2 stops of difference.

Bologna + Bessa L + Pushed AGFA Vista 400

Blog

I definitely don’t love pushed AGFA Vista 400 for street photography, but I think that it deserves a second try for night photography.

Here’s some pics i took in Bologna with my Voigtlander Bessa L, shutter times between 1 and 1/14, film pushed to 800 ISO. As i have already noticed HERE this film pushed works better in higly contrasted scenes.

I’ve underexposed by 1/3 to gain more contrast but, considering that pushing film does increase the contrast per se, next time I might try to overexpose by 1/3 to achieve a softer shade between lighter and darker areas.


Voigtländer Vitomatic IIa

Blog, Built To Last

Brand: Voigtländer
Model: Vitomatic IIa
Produced: 1960
Type: Rangefinder
Format: 35mm
Lens: fixed, Voigtländer Color-Skopar 50mm f / 2.8
Exposure: Manual, built in light meter
Focus: Manual rangefinder
ISO: 12-800 manual setting
Flash: PC Socket

Ah, so the needle should go inside the circle!

Voightlander_Vitomatic_IIa_16

The light meter window near the shutter release button

No, it’s not porn, i’m talking about a light meter, and it is the way in which, as a child, I learned how to do properly exposed images.

The lens of the Vitomatic IIa is excellent in sharpness and in color rendering, it is a Voigtländer and therefore is a guarantee. The lightmeter is pretty accurate, and you can see it inside the viewfinder and on a little window located at the top of the camera (so you can make adjustments without taking the camera to your eye). The meter indicator is composed by a needle, activated by the amount of light present in the scene, and by a circle that moves along with the aperture dial. To obtain the correct exposure the circle should overlap to the needle. Simple as eating candies, for a beginner 😉

Voightlander_Vitomatic_IIa_09All adjustments are made through the rings on the lens: time, aperture, focus, iso and flash, for which there is a plug for the PC cord, in fact the machine only has an accessory shoe.

voightlander_vitomatic_iia_zf

The focusing “automation” simbols

The focus is achieved through the rangefinder, ie in the center of the viewfinder there is a circular area where we see what we are framing doubled: turn the focus ring until the two images match up (for the subject you’d like to have in focus).

Continuing the discussion about the focus this camera has some sort of “automation”: on the lens there are two red symbols, a triangle and a circle, which indicates two focus distances which guarantee a large depth of field.
This can be really useful when shooting moving subjects or when you need to shoot rapidly such in street and candid photography.
Here below the diagram indicating the adjustments for this “zone focusing system”

dof-voigtlander-1

I have a love-hate relationship with this camera. I love it because it is my father’s camera and the one that I used to learn how to shoot. I also love the opportunity to recalibrate the exposure without having to put the eye on the viewfinder. The lens gives beautiful and sharp images.
But it has a few things that I consider to be flaws and which are quite annoying for me: first of all it is very heavy, about 800g, it is really uncomfortable to carry around! Then, in situations where there’s strong lights and in backlight, the rangefinder becomes almost unusable, is really hard to see the second image superimposed.
The last thing, and this is something related to my personal tastes, is that I prefer more wide lenses, 50mm are just too much!

Color film pushing disaster

Blog, Pocket Full Of Fatcaps

“Color film pushing disaster” what a nice title for a punk song or for a B-movie, isn’t it?

I was at a squat to see Darko play, they kick ass live, between other support act there were also the SOCS, great Bluesy driven Punk Rock from italy! In my bag I had my Yashica FX-3 Super 2000 loaded with a roll of Agfa Vista 400.

Well, I had already pushed the Vista 400 to 1600 ISO (as you can see HERE) and I decided to try and push it to the extreme: 3200 ISO.

I know that the “rule of thumb” of pushing film is to limit it to three stops and no more… But I was a drunk punk at a punk show so: who cares!

In addition to the many things that could go wrong (grain galore and reciprocity failure) the lighting was terrible: soft, diffuse and warm!

Even worse I was using color film so, the colors themselves, will probably go mad or went dull or be gorgeus: this is part of the unpredictability of pushing/pulling film!

Not happy with the possible defeat and having to finish the roll I’ve tried to take some pics at another live show with Red Car Burns (some post and some hardcore that You need to check out!!) and The Twerks (a bit of punk and some powerpop with a topping of 70s).

BTW the lights sucked even this time.

As you can see in the following gallery everything that could go wrong… it did!

Well, thankfully we are in 2016 and we can use our computers to try to recover the images! Again (just like HERE) the B&W is the “great savior” of us poor film enthusiasts. You can see the black and white processed image at the end of this post.

Note: I think I’ll try this extreme pushing of my beloved Agfa 400 with better lighting conditions 😉


Downtown Boys & dealing with red lights + color film

Blog, Pocket Full Of Fatcaps

collage_20151029150140835_20151029150930490_20151029181026558As a big fan of H.P. Lovecraft I know Providence in Rhode Island, and when i travelled to New York i managed to find some time to go there, where Cthulhu lives 😉

For me this was the only reason to know something about this city, but now, Downtown Boys are another good one!

They planned a gig in Milan and (fortuntately) I was there taking some film pictures. The venue “Sotto la Sacrestia” is not so big, so i took up my Yashica EZ View with its 30mm lens.

You can understand my disappointment when i noticed that the show was lighted only in red!!!

Fortunately I choose a P&S camera with AF and built in flash (Yashica EZ View) and I didn’t need to take care of the adverse light situation, but, once scanned the negatives, i noticed a subtle reddish glow on the skin of the musicians making them appear like boiled lobsters!

I was also using a roll of AGFA Vista 400 (that has warm and saturated colors) and so the effect was further amplified

Artifacts

Artifacts caused by adjusting only the red channel to increase skin brightness

As we all know B&W is the “big saviour” for this kind of things so i decided to convert all the photos!
Here it comes the second problem: the areas lit by the red lights were darker than usual! I’ve tried to brighten them by boosting the red channel but was unsuccessful! This because the neighboring areas, illuminated by the white light of the flash, were not affected by this adjustment causing horrific artifacts!

In my opinion, the best thing to do, was to boost the white balance temperature to have all the warm colors affected with a “red veil” and then boost the red channel to increase the brightness.

Scanned color film (Agfa Vista 400) -> B&W straight conversion (dark skin tone) -> B&W with WB & red channel correction

In the sequence: scanned color film (Agfa Vista 400) -> B&W straight conversion (dark skin tone) -> B&W with WB & red channel correction

About the band:

Their gig was a blast: english and spanish lyrics, politically driven, punk attitude and a saxophone!!! yes a saxophone, I never thought I could love so much this instrument in a punk band! I must say that their show was so engaging and full of energy that I regretted very much not to know the lyrics to sing out loud!

Check the photo gallery scrolling down and do yourself a favor: listen to the album and go see them when they play nearby!!!

https://www.instagram.com/p/BGYY0BMnM-1/?taken-by=buzz.mg


Brooklyn: film backstage for the Pois Gras’s shooting

Blog, Built To Last

While I was working as a lighting technician for Pois Gras, for a shooting inspired by the film Brooklyn, I took the opportunity to make a quick test with my Fuji DL-200 II and an Agfa Vista 400 film.

I just wanted to evaluate how this film reacts to the warm light of sunset.

The photos become more vivid and saturated and the colors richer as the sun was declining and the warmth of the sunlight increase.

You can read the Pois Gras post with the beautiful photos by Paola Saia here: Un look new vintage ispirato al film “Brooklyn” (sorry only in italian)

Thanks to Isabella Novati who posed, to Sara Pamio who took care of clothes and accessories and to Paola from Pois Gras who personally made makeup and wigs.

Yashica ML 50mm f1.9 + Agfa Vista + Bad Frog

Blog, Built To Last

I was at a free live show in Piacenza and in my bag i was carrying one of my “Photo Shove” film cameras and my Yashica FX3 super 2000.

On stage, in the town square, the Bad Frog was entertaining the audience with their italo-punkrock but unfortunately, in a location like that, it was virtually impossible to hope that there was some pogo or crowd surfing.

Thanks to the headliners rigs, the light set was more “professional” so I decided to take some pics with my SLR: I was testing a roll of AGFA Vista 400 pushed to 1600 and a 50mm f1.9 ML Yashica lens!

We must consider that I was shooting at F1.9 and F2.8, so my DoF were approximately between 1 to 2 meters and that the manual focusing in this low light conditions is really hard to do.

However I’m surprised about the results! Both the lens and the film have returned god colors and sharpness!!

Next time I’ll have to take more shots and try to push the AGFA to 3200! (HERE you can read about the first failed attempt)

Oh and I’m on the hunt for another ML Lens (maybe a 24mm)!

Built To Last: Ferrania Eura

Blog, Built To Last

Soon also in english 😉

Marchio: Ferrania
Modello: Eura
Prodotta: 1959
Tipologia: Medio Formato
Formato: 120mm
Obbiettivo: In plastica ad un elemento
Esposizione: Semi manuale senza esposimetro
Fuoco: Manuale in metri
ISO: Senza impostazioni
Flash: no

Ma che davero davero?

La Ferrania Eura e’ fondamentalmente un pezzo di plastica dal design retro’ e dall’aspetto divertente e accattivante.

La qualita’ degli scatti mi ha piacevolmente sorpreso, soprattutto se penso che l’obiettivo ha un solo elemento ed e’ di plastica!!! I controlli sono elementari: messa a fuoco, apertura focale e pulsante di scatto.

Eura_164320Iniziando dalla messa a fuoco, occorre precisare che non e’ presente nè un telemetro, nè nessun altro modo di “vederla”, infatti nella ghiera troviamo indicate le misure 2, 3, 5, 8 metri e Infinito e ci dobbiamo basare su quelle e sulla nostra capacita’ di valutare la distanza dal soggetto.

Abbiamo a disposizione 2 aperture focali f8 e f11 da usarsi rispettivamente in caso di ombra o cielo nuvoloso ed in caso di sole. Infine lo shutter, che scatta ad un tempo di 1/50… e non c’e’ modo di impostare gli ISO!

Questa cosa, ai giorni nostri, puo’ sembrare sconvolgente, in realta’ ai tempi era la norma ed era la base di costruzione di questo tipo di macchine, compresa la piu’ famosa Kodak Brownie.

Eura_164633Semplicemente la Eura era una macchina progettata per scattare di giorno, al sole o all’ombra, con un rullino da 50 ISO. Quando dico “di giorno” escludo ampiamente alba e tramonto e mi posiziono in quel lasso orario che va dalle 10 del mattino alle 5 del pomeriggio in primavera o estate, e dalle 11 alle 15 in inverno (calcolo impreciso ma rende l’idea della quantita’ di luce necessaria).

Personalmente ho usato un rullino da 100 ISO (Fomapan) e, avendo scattato un una giornata di sole incredibilmente bella, alcune foto sono risultate un po’ sovraesposte.

Naturalmente questa macchina offre altre possibilità, ma occorre essere un po’ scaltri nell’applicazione di certe conoscenze tecniche. Eura e’ nata per poter fotografare con f11 a 1/50 a 50 ISO il che ci da una valore di esposizione (EV) di (quasi) 14 cioe’ quello di una giornata di sole “media”, da qui,applicando la regola Sunny 16, scopriamo che usando 200 ISO la macchina possiamo scattare in giornate grigie e nuvolose (EV 12) e usando una pellicola 400 ISO arriviamo a scattare al tramonto (EV11).  Si potrebbe addirittura pensare ad arrivare (tirando il rullino) fino a 3200 ISO e scattando cosi’ anche in interno ben illuminati (EV8)… nulla ci vieta di sperimentare!

C’e’ anche l’attacco per il sincro del flash… e qui i calcoli si fan difficili… molto!!!

Eura_164746
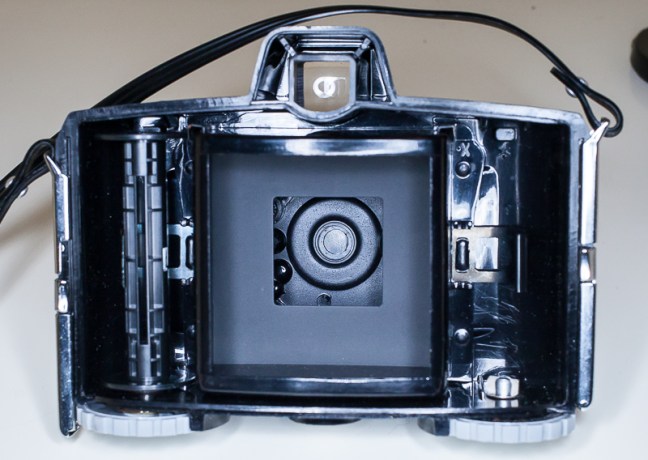
Occorre fare attenzione allo shutter, infatti scatta liberamente e non vi e’ nessun meccanismo che lo blocca in attesa dell’avanzamento della pellicole, quindi si richia di fare esposizioni multiple involontarie.

20160506_161939Ne consegue che l’avanzamento pellicola e’ libero, si tratta solamente di una rotella dentata senza fermi o blocchi, quindi dobbiamo guardare attentamente nel piccolo oblo’ sul retro per capire quando siamo arrivati al punto giusto per scattare un’altra foto. (NB solitamente le pellicole 120 hanno le indicazioni col numero di fotogramma, bastera’ far combaciare il numero al centro dell’oblo’)

Avendo ben due esemplari di questa macchina, mi son fatto accompagnare da Paola Saia la quale, gia’ abituata a scattare 6×6, ha acconsentito a testarne una per me.


Elefanti live: crash test analogico

Blog

Quindi, la mia amica Rossella e’ ufficio stampa di un nuovo power duo italiano: Elefanti, e mi ha invitato al loro primo concerto. In casa ho pronte due reflex analogiche preparate per fare delle foto in condizioni di bassa luce. Poi c’e’ la situazione da live show che rende difficile la lettura esposimetrica e rende necessaria la conoscenza di tutta una serie di regole classiche e misurazioni da fare “a occhio” per ottenere foto corrette e, trattandosi di in un piccolo locale, le luci probabilmente piu’ che basse saranno “ostili”, beh…

Barney-Sfida

Riassumendo: abbiamo da un lato una Canon AE-1 con obiettivo Canon FD 35-70 f4 e pellicola Fujifilm Superia 800 (tirata a 3200), dall’altro una Yashica FX3 super 2000 con obiettivo Yashica 50mm f1.9 con pellicola Agfa Vista 400 (tirata a 1600). Entrambe le pellicole sono state quindi usate con +2 stop rispetto agli ISO di fabbrica e, viste le specifiche dei due obiettivi, i valori di esposizione rimangono simili, permettendomi di usare entrambe le macchine con tempi di 1/60 o 1/125.

Le luci erano esattamente come me le aspettavo, poche, solo frontali e coloratissime, ottime per l’atmosfera ma un incubo per chi deve fotografare!

Sono abbastanza contento del risultato in generale ma devo dire che la fase di scatto e’ stata molto impegnativa: il telemetro ad immagine spezzata in condizioni di luce non ottimali e’ un po’ complicato da usare, bisogna cercare qualche zona di contrasto per poter riuscire a regolare il fuoco facendo ben combaciare le due parti dell’immagine (e notoriamente i musicisti non stanno proprio fermi). Il “trucco” e’ stato trovare di volta in volta una linea verticale ben contrastata , tipo l’asta di un microfono, e poi verificare valutando “ad occhio” i metri che separavano me e i musicisti!

Se pensiamo poi che in queste condizioni occorre usare f2.8 o poco piu’, c’e’ anche una profondita’ di campo limitata a rendere il tutto piu’ arduo. Nel mio caso andando a fare due calcoli su www.DofMaster.com, per la Canon potevo contare su una DoF che andava da 1.9 metri a 35mm fino a soli 40 cm a 70mm mentre per la Yashica  potevo giocarmela tra i 40 cm usando f1.9 e i 60cm usando f2.8

Come dicevo i tempi di scatto dovevano restare tra 1/60, per evitarmi il micromosso creato dalle mie stesse mani, e 1/125, per evitare mossi causati dai movimenti dei musicisti. Potevo permettermi di passare da un tempo all’altro senza compensare i diaframmi in quanto in fase di acquisizione e post produzione almeno uno stop di luminosita’ si riesce a recuperarlo.

A livello di feeling la Canon e’ un carro armato, da la sensazione di essere indistruttibile, ma la Yashica e’ piu’ leggera e snella e, se equipaggiata con uno Zeiss, puo’ diventare una piccola bomba.

Tra i due setup ho pero’ ho indubbiamente preferito la AE-1 con pellicola tirata a 3200 iso, poter usare f4 tranquillamente mi ha permesso di avere un maggior numero di immagini a fuoco, infatti grazie ad una maggiore profondita’ di campo, mi e’ stato perdonato qualche errore di messa a fuoco o, in casi estremi di “supposizione” della distanza di fuoco, poiche’ mi era impossibile vedere chiaramente nel mirino causa poca luce.

PS: Elefanti sono stati grandi 😉


Brooklyn: backstage analogico del servizio di Pois Gras

Blog, Built To Last

Mentre lavoravo come tecnico luci per Pois Gras durante un servizio ispirato al film Brooklyn ne ho approfittato per fare due test veloci con la mia Fuji DL-200 II e una pellicola Agfa Vista 400.

La cosa che mi premeva valutare era come questa pellicola reagisce alla luce calda del tramonto.

Sono rimasto stupito dalla saturazione, a volte esagerata, e dal calore di questa pellicola, ne sono risultate immagini vivide sature e ricche di colore man mano che il sole volgeva al tramonto e il calore della luce aumentava.

Potete leggere il servizio di Pois Gras con le stupende foto di Paola Saia qui: Un look new vintage ispirato al film “Brooklyn”

Ringrazio Isabella Novati che ha posato, Sara Pamio che si è occupata di abiti ed accessori e Paola di Pois Gras che ha realizzato personalmente trucco e parrucco.