
In old film cameras sometimes happens that the exposure meter batteries runs out, or that the selenium cells pass to a better life just at the wrong time or simply that the camera does not have a light meter!
How to solve this problem? With an old “rule” that our grandparents had discovered to “guess” the exposure. In reality behind it there are calculations, experiments and a fine knowledge of the medium 😉
The so-called Sunny 16 rule says that on a sunny cloudless day to achieve the perfect exposure you need to set the aperture to f/16 and the shutter as close as possible to the ISO of the film you are using.
So if I am using a 400 ISO film I have to set the aperture to f/16 with a speed of 1/500, for 100 ISO I will use 1/125 and so on.
After having applied this rule we can change aperture and shutter speed depending on our needs! For example if I’m using a 200 ISO film I should use f/16 and 1/250, but if my need is to photograph a fast moving cyclist, I can push the shutter speed to 1/1000 (2 stops) and compensate increasing the aperture of 2 stops up to f/8.
This is fine for optimal lighting conditions, with a strong sun that casts sharp shadows, but the same rule can also be applied to other lighting circumstances and the only change will be in the aperture settings. Thus, in a not so sunny day, in which the sun creates soft shadows, we will use f/11 instead of f/16, while for a cloudy day with barely visible shadows we will use f / 8 and, for a cloudy weather without visible shadows (or for shooting in full shade), we will set the aperture to f/5.6.
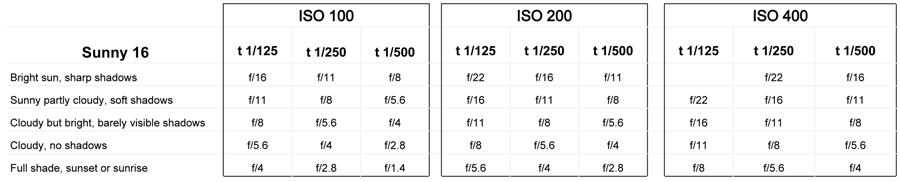
In “special” conditions, for example shooting in highly reflective environments (snow or white sand), you can use f/22 while for a sunrise or sunset the aperture can be set to f/4 reaching up to f/2.8 for the minutes before of the sunrise.
In case of backlight as a general rule, whatever may be the “power” of the light source, to have the subject properly exposed is necessary to apply the rule and then increase the aperture by two stops.
The Sunny 16 does not stop there, but also helps us in more specific and extreme conditions: for example we go down to f/2 if we want to photograph neon signs or earliest sunrise and sunset glow, f1.4 to expose the fire, shop windows after sunset or night outdoor events and f/1 to shoot indoors (with bright light) or indoor events.
It should be remembered that then in the darkroom, when you go to print the image, or when we scan the negative, we have a margin of at least one recovery stop, so it’s pretty hard to fail completely the exposure

I would like to add that this rule is the basis of the construction and utilization of some old cameras, back in fashion a few years ago with the Lomographic wave, such as the Kodak Brownie.
The Brownie has no controls: fixed focus to infinity, fixed aperture (f/15) and fixed shutter speed (approx 1/30) that allow it, with a roll of 100 ISO film, to make well exposed photos.
Or the Ferrania Eura wich has a fixed shutter speed of about 1/50 and the possibility to choose only two aperture: f/12 for sunny days and f/8 for the cloudy ones!
These cameras should only be used under certain conditions, but mastering the Sunny 16 rule, we can calculate the correct film speed to take advantage of the native settings for our needs: for example, mounting a 400 ISO film on a Ferrania Eura, make it possible to use it in conditions of full shade so with 2 stops of difference.

2 thoughts on “Metering without a light meter”