The Exposure Value

Blog, Pocket Full Of Fatcaps

Sometimes it’s difficult to know the values for a correct exposure. For example if we want to photograph the lights of the city at night the reading will be inaccurate because those distant sources of light are not intense enough to affect the exposimeter; Or maybe when we want to figure out if the 400 ISO film we have at home will allow us to take perfect photos with our Kodak Brownie during a sunny morning with the fixed settings of this camera (f/16 and 1/30).

There is a solution, but is a bit complicated!

What we’re going to know and use is the “Exposure Value” (EV) which is a unique number that indicates the brightness of a scene.

It is obtained by using a mathematical calculation referred to a sensitivity of 100 ISO:
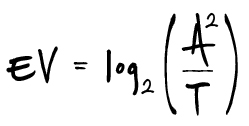
EV_Formula

Obviously the same exposure value can be obtained with different combinations of the three parameters (ISO/A/T) which is also the concept at the foundation of exposure and photography.

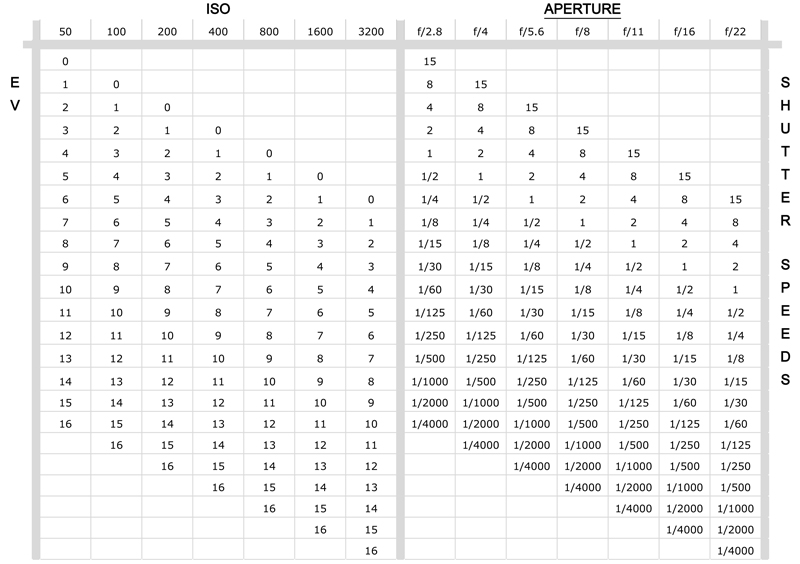
Leaving aside all the mathematical part, we can simply use one of the many charts that we can find on the net, or the one that I propose below (referred to 100 ISO):
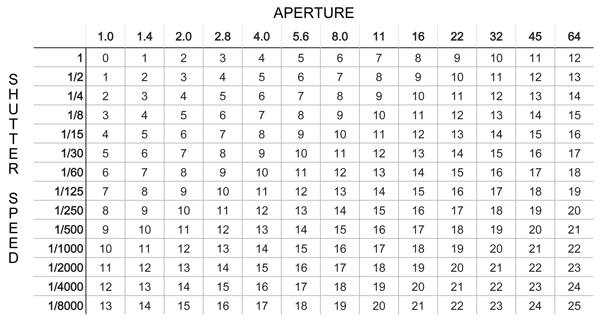
Now to take advantage of the EV you have to connect it to the Sunny 16 rule (on a sunny day, with sharp shadows, to get a correct exposure you have to use f/16 and a shutter speed as closest as possible to the ISO of the film you are using). The EV is a calculation based on 100 ISO then, comparing the values of the Sunny 16 for the same value (f16 and 1/125) with those on the EV chart above, we derive that 15 EV is the amount of light that is present on a sunny day with sharp shadows!

Below I suggest an exemplary data table of how to exploit the EV value in combination with the Sunny 16 rule based on different iso settings but keeping 1/125 as shutter speed:

So I took the EV, I’ve mixed it with the Sunny 16 and I’ve got a handy data table to “guess” the perfect parameters for a good exposition: now you have to simply rearrange the table with your favourite shutter speeds, ISOs and apertures. I know that is a difficult mathematical exercise so I’ve done it for you šŸ˜‰

A practical use of this value, as I mentioned, is to help us decide which film we can use referring to the  amount of available light there will be in the scene that we are going to shoot. Or maybe it will help to understand the shutter speeds and apertures needed in conditions where the meter will not function correctly.

Transforming this knowledge into a practical example we can say that if we have to shoot at an indoor sport event, which we know have an EV of 7, we cannot take with us a 400 ISO film, because the camera settings will be f/2.8 1/60: too slow for almost every action.
At least with 800 ISO we can have a shutter speed of 1/125, but may be f/2.8 may result in a too narrow depth of field.
The best decision will be to use a roll of film that tolerate being pushed to 3200 ISO without losing too much quality so we can select an array of settings between f/2.8 + 1/500 or f/4 + 1/250 or even f/5.6 + 1/125. That will be enough to let us choose between a faster shutter speed or a deeper DoF.

Metering without a light meter

Blog, Pocket Full Of Fatcaps

In old film cameras sometimes happens that the exposure meter batteries runs out, or that the selenium cells pass to a better life just at the wrong time or simply that the camera does not have a light meter!

How to solve this problem? With an old “rule” that our grandparents had discovered to “guess” the exposure. In reality behind it there are calculations, experiments and a fine knowledge of the medium šŸ˜‰
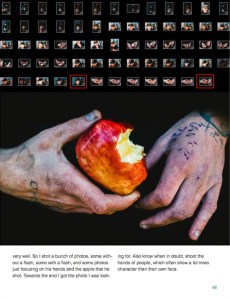
The so-called Sunny 16 rule says that on a sunny cloudless day to achieve the perfect exposure you need to set the aperture to f/16 and the shutter as close as possible to the ISO of the film you are using.

So if I am using a 400 ISO film I have to set the aperture to f/16 with a speed of 1/500, for 100 ISO I will use 1/125 and so on.
After having applied this rule we can change aperture and shutter speed depending on our needs! For example if I’m using a 200 ISO film I should use f/16 and 1/250, but if my need is to photograph a fast moving cyclist, I can push the shutter speed to 1/1000 (2 stops) and compensate increasing the aperture of 2 stops up to f/8.

This is fine for optimal lighting conditions, with a strong sun that casts sharp shadows, but the same rule can also be applied to other lighting circumstances and the only change will be in the aperture settings. Thus, in a not so sunny day, in which the sun creates soft shadows, we will use f/11 instead of f/16, while for a cloudy day with barely visible shadows we will use f / 8 and, for a cloudy weather without visible shadows (or for shooting in full shade), we will set the aperture to f/5.6.

Sunny 16 rule computed for the most common times and ISO settings – Click to enlarge

In “special” conditions, for example shooting in highly reflective environments (snow or white sand), you can use f/22 while for a sunrise or sunset the aperture can be set to f/4 reaching up to f/2.8 for the minutes before of the sunrise.

In case of backlight as a general rule, whatever may be the “power” of the light source, to have the subject properly exposed is necessary to apply the rule and then increase the aperture by two stops.

The Sunny 16 does not stop there, but also helps us in more specific and extreme conditions: for example we go down to f/2 if we want to photograph neon signs or earliest sunrise and sunset glow, f1.4 to expose the fire, shop windows after sunset or night outdoor events and f/1 to shoot indoors (with bright light) or indoor events.

It should be remembered that then in the darkroom, when you go to print the image, or when we scan the negative, we have a margin of at least one recovery stop, so it’s pretty hard to fail completely the exposure

Ferrania Eura: the two apertures available / I due diaframmi disponibili

I would like to add that this rule is the basis of the construction and utilization of some old cameras, back in fashion a few years ago with the Lomographic wave, such as the Kodak Brownie.
The Brownie has no controls: fixed focus to infinity, fixed aperture (f/15) and fixed shutter speed (approx 1/30) that allow it, with a roll of 100 ISO film, to make well exposed photos.
Or the Ferrania Eura wich has a fixed shutter speed of about 1/50 and the possibility to choose only two aperture: f/12 for sunny days and f/8 for the cloudy ones!

These cameras should only be used under certain conditions, but mastering the Sunny 16 rule, we can calculate the correct film speed to take advantage of the native settings for our needs: for example, mounting a 400 ISO film on a Ferrania Eura, make it possible to use it in conditions of full shade so with 2 stops of difference.

Color film pushing disaster

Blog, Pocket Full Of Fatcaps

“Color film pushing disaster” what a niceĀ title for a punkĀ songĀ or for a B-movie, isn’t it?

I was at a squat to see Darko play, they kick ass live, between other support act there were also the SOCS, great BluesyĀ driven Punk Rock from italy! In my bag I had my Yashica FX-3 Super 2000 loaded with a roll of Agfa Vista 400.

Well, I had already pushed the Vista 400 to 1600 ISO (as you can see HERE) and IĀ decided to try and push it to the extreme: 3200 ISO.

I knowĀ thatĀ the “rule of thumb” of pushing film is to limit it to three stops and no more… But I wasĀ a drunk punk at a punk show so: who cares!

In addition to the many things that could go wrong (grain galore and reciprocity failure) the lighting was terrible: soft, diffuse and warm!

Even worseĀ I was using color film so, the colors themselves, will probably go mad or went dull or be gorgeus: this is part of the unpredictability of pushing/pulling film!

Not happy with the possible defeat and having to finish the rollĀ I’ve tried to take some pics at another live show with Red Car Burns (some post and some hardcore that You need to check out!!) and The Twerks (a bit of punk and some powerpop with a topping of 70s).

BTW the lights sucked even this time.

As you can see in the following gallery everything that could go wrong… it did!

Well, thankfully we are in 2016 and we can use our computersĀ to try to recover the images!Ā AgainĀ (just like HERE) the B&W is the “great savior”Ā of us poor film enthusiasts. You can see the black and white processed image at the end of this post.

Note: I think I’ll try this extreme pushing of my beloved Agfa 400 with better lighting conditions šŸ˜‰


Downtown Boys & dealing with red lights + color film

Blog, Pocket Full Of Fatcaps

collage_20151029150140835_20151029150930490_20151029181026558As a big fan of H.P. Lovecraft I know Providence in Rhode Island, and when i travelled to New York i managed to find some time to go there, where Cthulhu lives šŸ˜‰

For me this wasĀ the only reason to know something about this city, butĀ now, Downtown BoysĀ are another good one!

They planned a gig in Milan and (fortuntately) I was there taking some film pictures. The venue “Sotto la Sacrestia” is not so big, so i took up my Yashica EZ View with itsĀ 30mm lens.

You can understand my disappointment when i noticed that the show was lighted only in red!!!

Fortunately IĀ choose a P&S camera with AF and built in flash (Yashica EZ View) and I didn’tĀ need to take care of the adverse light situation, but, once scanned the negatives, i noticed a subtle reddish glow on the skin of the musiciansĀ making them appear likeĀ boiled lobsters!

I was also using a roll of AGFA Vista 400Ā (that has warmĀ andĀ saturated colors) and so the effect was further amplified

Artifacts

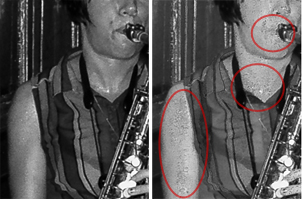
Artifacts caused by adjusting only the red channel to increase skin brightness

As we all know B&W is the “big saviour” for this kind of things so i decided to convert all the photos!
Here it comes the second problem: the areas lit by the red lights were darker than usual! I’ve tried to brighten them by boosting the red channel but was unsuccessful! This because the neighboring areas, illuminated by the white light of the flash, were not affected by this adjustment causing horrific artifacts!

In my opinion, the best thing to do, was to boost the white balance temperature to have all the warm colors affected with a “red veil” and then boost the red channel to increase the brightness.

Scanned color film (Agfa Vista 400) -> B&W straight conversion (dark skin tone) -> B&W with WB & red channel correction

In the sequence: scanned color film (Agfa Vista 400) -> B&W straight conversion (dark skin tone) -> B&W with WB & red channel correction

About the band:

Their gig was a blast: english and spanish lyrics, politically driven, punk attitude and a saxophone!!! yes a saxophone, I never thought I could love so much this instrument in a punk band!Ā I must say that their show was so engaging and full of energy that I regretted very much not to know the lyrics to sing out loud!

Check the photo gallery scrolling down and doĀ yourself a favor: listen to the album and go see them when they play nearby!!!

https://www.instagram.com/p/BGYY0BMnM-1/?taken-by=buzz.mg


E-Book gratuito: Street Photography Contact Sheets di E. Kim

Blog

Direttamente da Eric Kim, una delle nuove stelle della street photography, un e-book gratuito riguardante il suo processo creativo dallo scatto allaĀ selezione delle immagini.

Street-Photography-Contact-Sheets-Eric-Kim-5Ispirato al volume Magnum Contact Sheets,Ā che lui stesso definisce “il più utile ed educativo libro di fotografia che sia mai stato stampato”, l’e-book copre alcuni interessantissimi argomenti quali l’importanza dei provini a contatto, come “gestire la scena” che stiamo scattandoĀ eĀ come approcciarsi agli sconosciuti (argomento topico per moltissimi street photographers).

InoltreĀ il libro e’Ā “open source”, vale a dire che e’Ā possibile condividerlo, scaricarlo e contribuire ad arricchirne il contenuto.

Per scaricarlo:

Visitando l’articolo originale di Kim eĀ scorrendo fino inĀ fondo alla pagina, troverete molti links per altriĀ free e-books šŸ˜‰

Cover e immagini Ā© Erik Kim